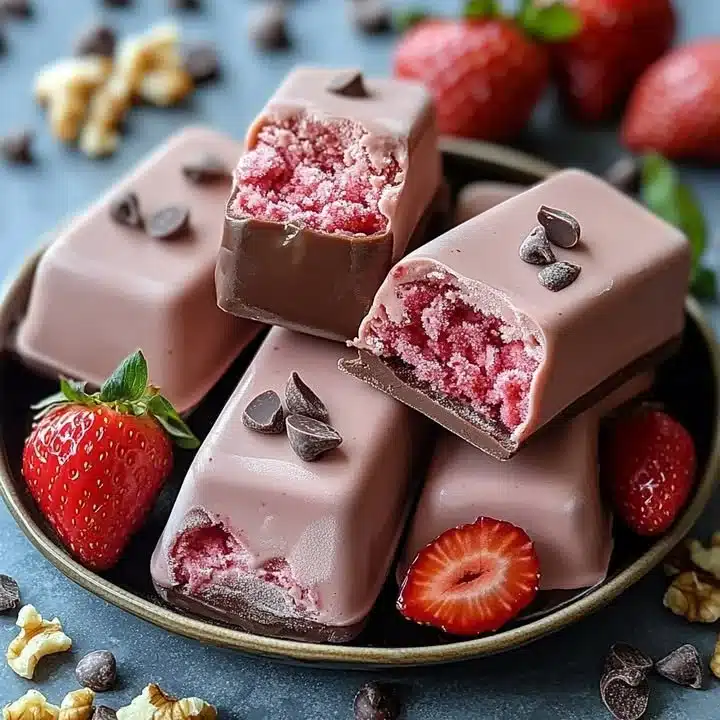
Homemade Chocolate-Strawberry Ice Cream Bars are the ultimate summer treat that combines rich chocolate with refreshing strawberries. With just a few simple ingredients and a bit of patience, you can create a delightful dessert that will impress family and friends. These ice cream bars offer a smooth and creamy texture with a crunchy chocolate coating, making them perfect for warm weather and special occasions.
Why Make This Homemade Chocolate-Strawberry Ice Cream Bars
There are countless reasons to whip up a batch of Homemade Chocolate-Strawberry Ice Cream Bars. First and foremost, they are incredibly delicious! You get the bright and fruity flavor of fresh strawberries blended into creamy ice cream, all covered in silky chocolate.
Additionally, making ice cream bars at home allows you to customize them to your taste preferences. Want extra strawberries or a hint of mint? Go for it! These dessert bars are also a great way to involve kids in the kitchen, making it a fun family activity. Plus, they’re free from any artificial flavors and preservatives often found in store-bought versions, giving you peace of mind about what you’re serving.
How to Make Homemade Chocolate-Strawberry Ice Cream Bars
Creating these ice cream bars is a straightforward process that requires only a couple of steps. You will start with a delightful strawberry ice cream base, followed by the chocolate coating, and finally, assembly for a delicious treat. Don’t worry if it seems overwhelming—just follow the steps, and you’ll have delicious ice cream bars ready in no time!
Ingredients:
- 2 cups fresh strawberries, hulled and chopped
- 1/2 cup sugar
- 1 cup heavy cream
- 1/2 cup whole milk
- 1 teaspoon vanilla extract
- 2 cups semisweet chocolate chips
- 2 tablespoons coconut oil or vegetable oil
- Optional toppings: chopped nuts, sprinkles, freeze-dried strawberries
Directions:
Step 1: Make the Strawberry Ice Cream
Start by blending the strawberries and sugar in a blender until smooth. This mix is the star of your ice cream bars! Then, combine the strawberry puree with the heavy cream, whole milk, and vanilla extract in a mixing bowl. Mix well until everything is combined. If you have an ice cream maker, pour the mixture in and churn it according to the machine’s instructions. If you don’t have an ice cream maker, you can simply freeze the mix in a container, stirring every hour until it’s firm—this usually takes about 6 hours.
Step 2: Prepare the Ice Cream Bars
Once the ice cream has set and is firm, spoon it into molds or a lined baking dish. Spread it evenly and freeze for an additional 4-6 hours until solid. If you want to get creative, use fun-shaped molds for a festive touch!
Step 3: Make the Chocolate Coating
In a microwave-safe bowl, combine chocolate chips and coconut oil (or vegetable oil for a neutral flavor). Microwave in 30-second intervals, stirring after every round until the mixture is melted and smooth. This will be the luscious coating that brings your bars to life.
Step 4: Assemble the Ice Cream Bars
When the ice cream is ready, remove the bars from the molds or cut them into rectangles if you’ve used a baking dish. Dip each ice cream bar into the melted chocolate, letting the excess drip off. For an extra touch, sprinkle on your favorite toppings like chopped nuts, sprinkles, or freeze-dried strawberries before placing them on a parchment-lined tray. Freeze for about 15 minutes to allow the chocolate to set.
Nutritional Information
For each serving of Homemade Chocolate-Strawberry Ice Cream Bars (assuming 10 servings), the approximate nutritional information is:
- Calories: 210
- Total Fat: 12g
- Saturated Fat: 7g
- Cholesterol: 40mg
- Sodium: 30mg
- Total Carbohydrates: 24g
- Dietary Fiber: 1g
- Sugars: 18g
- Protein: 2g
How to Serve Homemade Chocolate-Strawberry Ice Cream Bars
These ice cream bars are perfect for summer gatherings, birthday parties, or even a cozy movie night. Serve them on a platter with extra toppings on the side for guests to customize their own bars. Pair them with fresh fruit or a drizzle of chocolate sauce for a luxurious dessert experience.
How to Store Homemade Chocolate-Strawberry Ice Cream Bars
To keep your ice cream bars fresh, store them in an airtight container in the freezer. If wrapped individually in plastic wrap or parchment paper, they can last for up to two weeks. Be sure to make enough to have leftovers!
Expert Tips for Perfect Homemade Chocolate-Strawberry Ice Cream Bars
- Use Fresh Strawberries: The quality of your strawberries will significantly influence the flavor. Opt for ripe, sweet berries for the best results.
- Chill Your Mixing Bowl: For even creamier ice cream, chill your mixing bowl before combining the ingredients.
- Experiment with Toppings: Feel free to get creative with toppings! Consider mini marshmallows, caramel drizzle, or even crushed cookies for a fun twist.
- Adjust Sweetness: If you prefer a less sweet treat, reduce the sugar used in the strawberry ice cream base.
Delicious Variations
- Mint Chocolate-Strawberry Bars: Add a few drops of peppermint extract to your strawberry mixture for a refreshing minty flavor.
- Nutty Delight: Incorporate crushed pistachios or almonds into the chocolate coating for an exciting crunch.
- Dairy-Free Option: Substitute coconut cream for heavy cream and use a dairy-free milk alternative for a delicious vegan treat.
Frequently Asked Questions
Can I use frozen strawberries?
Yes, frozen strawberries work well! Just thaw them slightly before blending to make a smooth puree.Do I need an ice cream maker?
No, you can freeze the mixture in a container, stirring every hour as it freezes, to achieve a creamy texture without an ice cream maker.How can I make these bars lower in sugar?
You can reduce the amount of sugar used in the recipe. Alternatively, consider using a natural sweetener like honey or agave syrup.
Conclusion
Making Homemade Chocolate-Strawberry Ice Cream Bars is a fun and satisfying project that results in a delightful frozen treat. With fresh ingredients and easy steps, you’ll enjoy the sweet taste of summer every time you take a bite. So why not gather your loved ones and give this recipe a try? Don’t forget to share your creations and celebrate the joy of homemade desserts!